


Frankie is an affectionate acronym for FrankenCamera. My friend and mentor, Ed LaCasse, first coined the term while considering building his own version of cobbled components for his interior architectural shooting. He has since completed the third generation custom camera which has given him the equivalent of a 12mm lens on full sized Hasselblad digital back with a very portable rig. Very cool...
My version, designed for a completely different application, started with some of his original parts and went from there.
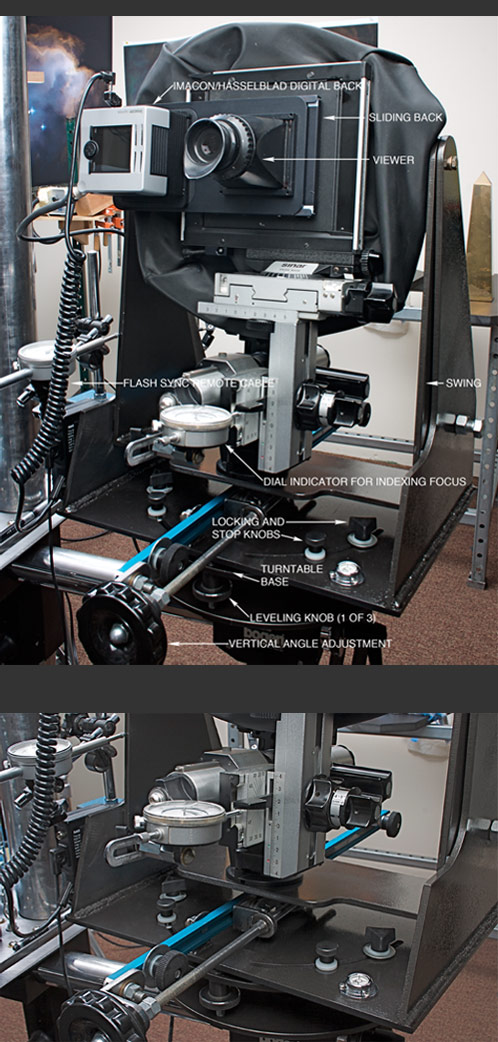
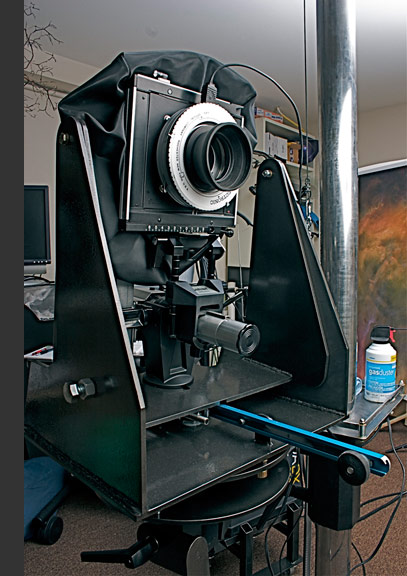
Built around my Imacon 528C digital back, with a hookup to a remote strobe trigger, it is mounted on a sliding back with viewer on the rear of my Sinar P view camera.
The Frankie carriage is on a rigid 3-point precise leveling plate that mounts to the reinforced camera stand. The same carriage can rotate.
The inner "swing" allows for precise angle adjustments (repeatable to the thousandth by the long dial indicator to the left) and is adjustable on the "Y" and "Z" axis. The whole key is being able to identify the precise non-parallax "exit pupil" location (quite commonly mistakenly called the "nodal point") in my lens then adjusting the camera to pivot exactly on that point.
There are a several commercial setups designed to perform similar functions but most only allow for the "X" axis; I also wanted to be able to handle the "Y" axis. Standard setups are considerably lighter--good for them, bad for me--and typically use lower resolution backs (the Imacon, in its maximum mode, generates a 508 meg 16 bit file).They also do not allow for movements or the use of the range of lenses or allow for my depth-of-field progressions, a huge issue for me. And they are incredibly expensive...
The other problem is the vast majority of the stitching you see with the typical landscape images begins its foreground some number of yards in front of the camera. Combined with modern software, that leaves one with quite a bit of range for error and the blending tolerances are considerably larger than shooting in a near macro mode.
In the studio, in fact, I found there is no room for error at all; the exit pupil for the lens must line up to the thousandth. Additionally, I do the majority of my stitching manually to allow for maximizing my lighting technique and its variations. That puts even more pressure on proper and precise setup.
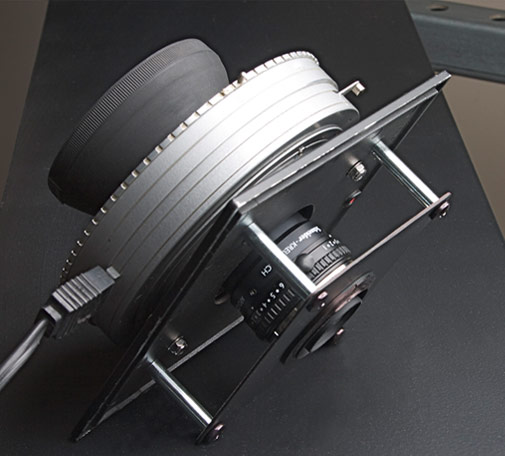
As referenced above, the large format body is critical for its movements and flexibility with lenses. My favorite lens is a remarkably sharp 60 mm. machine vision model that was not meant to cover a medium format chip with typical lens/back spacing. I therefore count of increasing its image circle by designing my sets to be shot at a very close range; so close, in fact, I get a large enough image circle to allow for full lateral and vertical movements.
To the right you see more of a closeup. The dial central dial indicator is critical for my use of Helicon Focus software and the many layers I use to achieve extended depth-of-field (my deepest was 53 layers with Realization of Freedom). The focal plane gets so narrow in a near macro mode that, on average, I adjust the back standard of the camera forward 15 to 35 thousandths at a time depending on distance from the set. The tolerances would not be so tight for single exposure images but as I normally reshoot any aspect of a set from 4 to 7 times, incorporating a different lighting arrangement each time, the need to reset the focal planes exactly with sequential exposures is essential.
Below you see the custom lens assembly and a view of the camera front with the original electronic shutter (later abandoned for manual operation (machine vision lenses, like enlarging lenses, do not have shutters).
As I am, essentially, using a 60 mm. lens as a medium format macro lens (the standard is 120 mm.) I had to mount the lens internally to get the focal range close enough to the chip. This, off course, mandated the wide angle bellows.
The other purpose of using a wider lens, combined with stitching, was to instill an unexpected shift in visual perspective in the final image in a full sized print. Acknowledging our brains are hard wired for certain relationships, tweaking the expected reality can have its benefits (or just be wierd).
For near macro stitching with high resolution final prints using Lightjet film (I'm up to six feet so far) tight tolerances for level, parallel, spacing and so forth are critical. But when it all comes together... ( To revisit the making of Realization of Freedom, click here.)
This is actually my second version of the camera concept and I have third in mind to make further improvements. Though infinitely large landscape panoramas are becoming commonplace, there are several critical aspects of near-macro work the technology does not address. My goal is to eventually take a very small set and turn it into a razor sharp 4'X10' superglossy Lightjet. But is is going to be one bit chunk of work...